
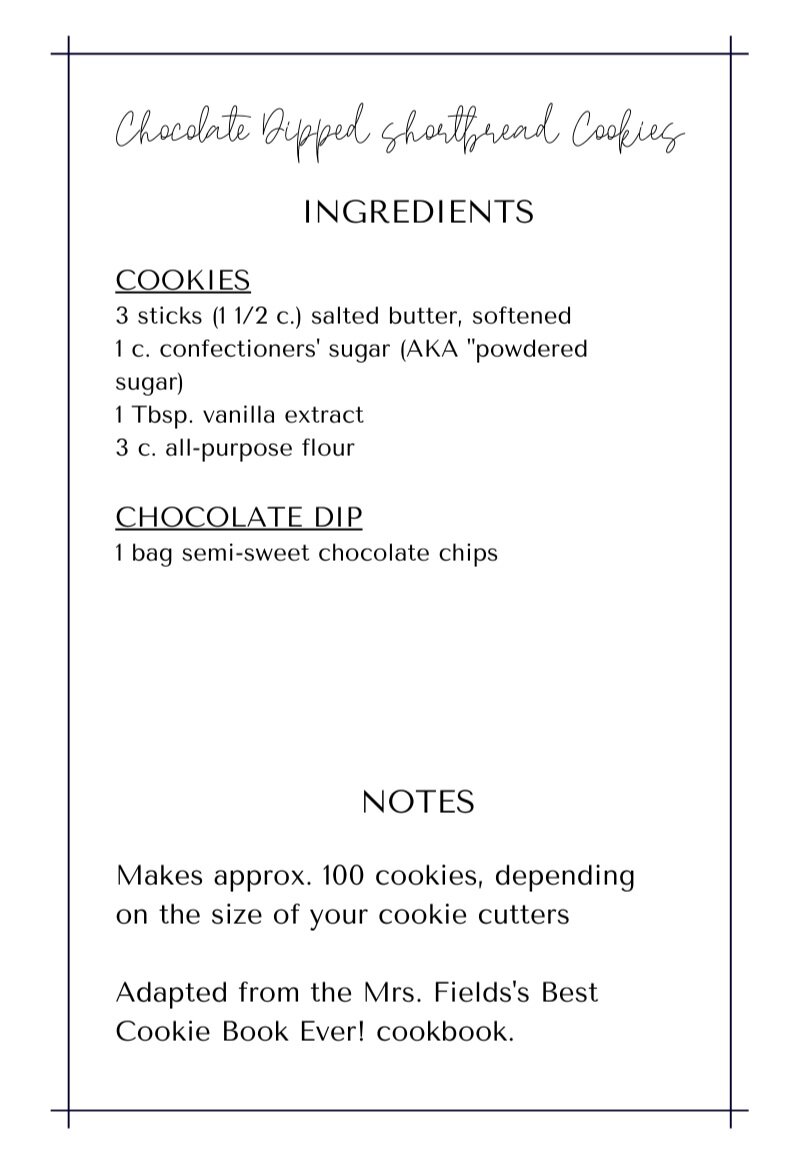
Chocolate Dipped Shortbread Cutouts

DAY 2, 2020
I love shortbread cookies. They’re flaky, buttery, and remind me of my semester spent in Scotland. But I don’t typically include anything shortbread in my Christmas Eve cookie baskets. Why? Because shortbread is incredibly delicate.
Baking for the holiday gifts is a multi-week affair. Since cookies keep well when refrigerated, I usually make the hardier cookies up to two weeks in advance, place them in gallon-sized ziplock baggies, and refrigerate them until December 23rd, which is always cookie assembly day. The last time I made shortbread, half of the cookies were already broken when I took them out of the fridge and a significant number more broke on the transfer from the bag to the baskets.
This makes sense, when you understand a little about the chemistry involved in baking. Don’t worry, this won’t be anything like you’re 10th grade Chemistry class (I’m looking at you, Mr. Fadden.) Okay, here goes: cookies usually contain eggs, which act as the binding agent that helps to hold them together. Shortbread, however, does not contain eggs. Nor does it contain any other binder. It’s literally nothing but butter, sugar, flour, and vanilla extract. Which means there’s nothing to keep it from falling apart under pressure (kinda like me in 2020 - I was a shortbread cookie this year). Therefore, it usually just doesn’t make the cut for my holiday cookies.
But this year is not a normal year. I have a little more latitude in my cookie choices since I’m not actually packaging these cookies up for any of you - and shortbread makes sense for my family because my daughter, Stella, has food allergies. She’s outgrown most of them, but she still has reactions to pistachios, cashews, and unbaked eggs. And, while cookies are most definitely baked, they’re often not baked enough for Stella. They need to be super crispy to be safe for her (the Cinnamon Sugar Cookies from yesterday weren’t intended to be Stella-safe but they ended up that way because of all of the mistakes I made in baking them - happy accidents, because it turns out she loves those cookies!) But, shortbread - shortbread is perfect for her because it doesn’t have any egg at all. Today, she even enjoyed the time-honored tradition of licking the bowl for the very first time in her life. Best. Day. Ever!
This is another recipe from my fav Mrs. Fields’ Best Cookie Book Ever! cookbook. I promise I will make non-Mrs. Fields cookies, starting tomorrow. Stay tuned.
A word of caution, though - shortbread is not for everyone. It’s not as sweet and definitely not as chewy as a traditional cookie. It’s more like the cookie you’d want to have with your coffee in the morning than the one you crave while watching Sunday Night Football. Or one of the Twilight movies that’s on Freeform literally every night. If shortbread isn’t your jam, that’s cool. But maybe it is and you just don’t know it yet? Maybe you’ve been missing a morning cookie with your coffee in your life and you didn’t even realize it. It’s totally possible.
step 1: gather your ingredients
No need to preheat the oven right now - these cookies need to be refrigerated for a couple of hours before they can be rolled out.
Gather your butter, confectioners’ sugar, vanilla extract, and flour. You can even leave the chocolate chips in the pantry for now - just make sure you have them.
step 2: combine the wet ingredients
Throw your butter, all three sticks of it, into a bowl and blend until it’s smooth. Add confectioners’ sugar in small amounts and beat into the butter. Slowly. This isn’t a race and your clothes will thank you for not covering them in a cloud of confectioners’ sugar. I forgot this part today and ended up covering my son’s pajama shirt arm in powdered sugar and sending a plume of it into the air. There was so much of it he even screamed, “I can taste it! I love sugar!!!” Yeah, buddy, I know. (Side note: I have no idea why sugar is considered to be a “wet ingredient” but it is. Maybe because it’s always combined with the other wet ingredients? I dunno.)
Once the confectioners’ sugar has been completely incorporated into the butter, add the vanilla and beat everything for a good 20 seconds or so.
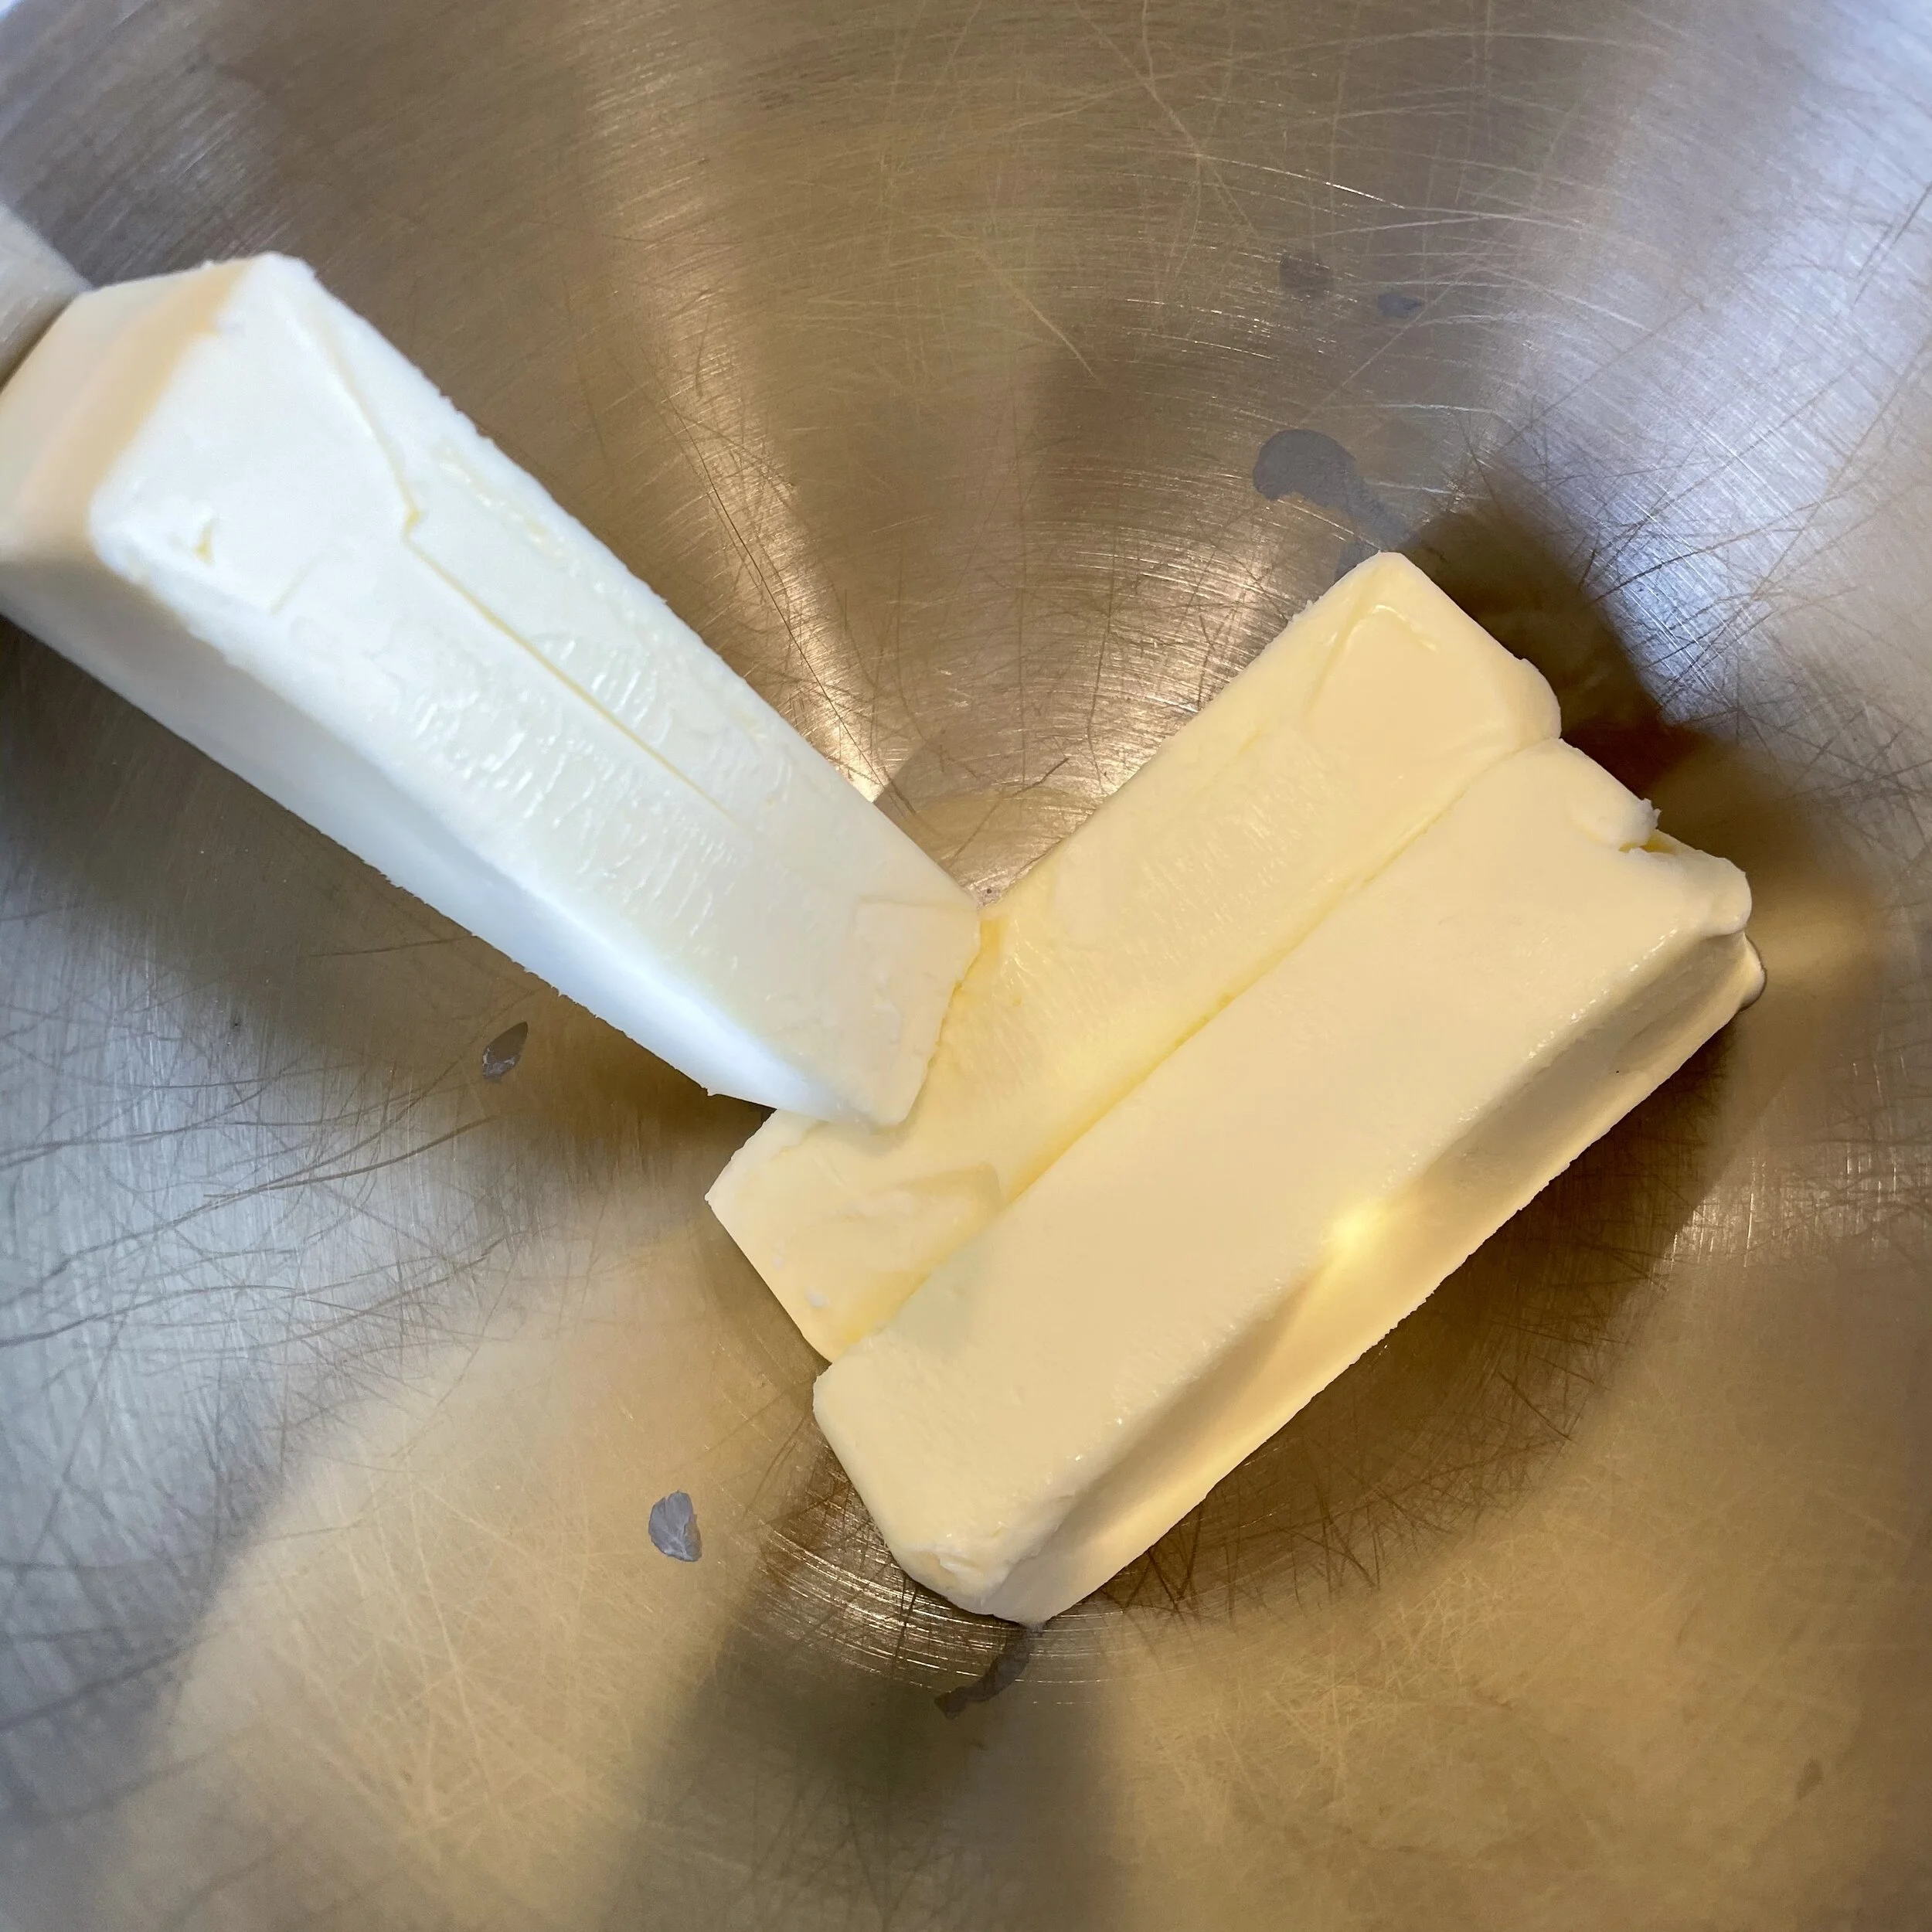
Three sticks of butter. Even for cookies, that’s alotta butter…
step 3: add the flour
Add the flour to the wet ingredients - again, in small amounts, very slowly. Maybe I should have mentioned before that it’s good to ask Alexa to play holiday music while you’re baking holiday cookies. It makes everything much more fun and festive, even when you’re annoyed because you can’t just dump all of the flour in at once. That is, until your kids realize they can whisper to Alexa and she will still obey their commands, and you end up in an epic music on/music off battle with a couple of tiny humans. Not that this happened in my home today or anything…

Your dough will look a little chunky, and that’s okay. It’s juuussstt right :)
step 4: prepare to refrigerate
Lay a piece of plastic wrap or (my personal favorite) Press-and-Seal on the counter and place half of the dough on top. Gather the dough into your hands and knead it into a ball. Your formerly chunky dough will smooth out pretty quickly once you start working with it. Place the ball back on the plastic wrap, flatten it into a disc about 3/4” high, and wrap it up tightly. Repeat this process with the other half of the dough. Place both discs in the fridge and forget about them for at least a couple of hours, or even a couple of days. Whatever floats your boat.

Smooth ball-o-dough, ready to be smashed into a disc. It’s super fun to do :)

While the recipe technically states you need “two equally-sized balls of dough” mine never turn out to be equal. It’s no big deal.
step 4: roll out the dough
Once your dough has sufficiently hardened in the fridge, take one disc out at a time and get ready to roll it. Preheat your oven to 325 degrees - it’s time to bake these little guys!
Be prepared for the fact that it will take a fair amount of muscle to roll out your dough at first, but it will get easier. There are two keys to rolling out cut-out cookies:
Flour. Flour your surface, flour the top of the disc, even flour your rolling pin. You’ll want to cover that floured disc with wax paper before you roll it out, but if you roll it beyond the edge of the wax paper you don’t want it to get stuck to you rolling pin. Don’t be afraid of flour - now is not the time to be worried about the carbs.
Don’t roll it too thin. Roll your dough out until it is about 1/4” thick. Believe it or not, 1/4” is likely higher than you’d think it would be. Don’t let your dough get any thinner - it will be hard to get the cookies off of your surface and it will make your cookies crispy rather than chewy.

Just before I floured the top of the disc. Flour EVERYTHING. Then use a vacuum to clean up the floor when you’re done.

This is what my rolled out dough looked like. It’s not about to win any beauty contests, but it’s the right height and that’s what matters.
step 5: cut out your cookies
This is the most fun part, in my opinion. I used cookie cutters that are about 2” tall - use whatever you want, but be aware that the bigger the cookie cutter, the more difficult it will be to keep your cookies in tact all the way through the rest of the process.
Press your cookie cutter firmly into the dough until you reach your working surface. At this point, I like to give my cookie cutter a little wiggle - just enough to separate the cookie from the rest of the dough. Remove the cookie cutter and then move away the excess dough around your cookie to give yourself the clearest path to removing the cookie from the working surface. Do this part carefully to prevent tearing your cookie. But if you do, no biggie - just add it to the rest of your scraps to be rolled out again.
Place each cookie about 1/2” apart on your parchment-lined baking sheet. If the cookie doesn’t fall right out of the cutter, you can put some gentle pressure on it from the back to get it to drop out. Continue until you have no more space to cut out cookies in the dough, just scraps - then, gather your scraps together and knead into another ball. Flour your new ball and roll it out, just as before (no need to refrigerate, this time), and continue cutting out your cookies. Repeat this process until you don’t have enough dough left to make even one cookie. Then, go get the other dough disc from the fridge and do the whole thing again.

Pull the extra dough away from your cookie. Throw yourself a bone - getting that cookie to the tray can be tricky!

Just a bit of pressure from the back of the cookie cutter can slide that puppy right out.

Oh, hey there, little guy!

She loves the stars - it’s hard to keep your paws off of your favorite shape when you’re 3 :)
step 6: bake your cookies
The original recipe says to cook your cookies for 16 - 18 minutes but, per usual, that’s too long. Mine took 13 minutes for two trays. Keep an eye on your cookies and take them out just before you think they’re about to turn brown on the underside edge. Let the cookies cool for 1 minute on the tray, then transfer to a wire rack to cool the rest of the way.

These are some good lookin’ cutouts, if I do say so myself.

I had some curly tree tops… I’ll discuss this later but, no, this was not intentional.

Note to self: they cook faster when there’s only one tray in the oven…

Stella, happy to have her very own cookies and giving me this really odd celebration pose.
step 7: dip your cookies in chocolate
Okay, I’m going to break with the original recipe here. Today, I went out on a limb and tried a method for melting chocolate that I’d never tried before, the one prescribed in the recipe. It involved heavy cream, corn syrup, and chocolate chips on the stovetop and, while it did the trick, there’s one major problem with my chocolate-dipped cookies: the chocolate won’t firm up. If I wanted to keep these cookies in the fridge at all times, no problemo. But if this was a non-pandemic year and I wanted to put these in the cookie baskets, the chocolate would get all over EVERYTHING.
Here’s what I want you to do instead - dump your bag of chocolate chips in a microwave-safe bowl and nuke it for 30 seconds. Take it out and stir it with a fork. Put it back in for only 15 seconds. Take it out and stir it with a fork. Continue at 15 second intervals until your chocolate is smooth. But be super careful - chocolate will burn VERY quickly. Even an extra 15 seconds will ruin your chocolate. So don’t rush this process.
Once your chocolate is melted, dip 1/3 to 1/2 of each cookie in the chocolate and place the cookies on a wax paper-lined cookie sheet to cool. Your chocolate will firm up and you will have perfect chocolate-dipped shortbread cookies. Pinky promise.

Mistakes Made…
You’ve likely already spotted my errors (3, again today) but here they are, highlighted in all of their glory, so you may learn from my mistakes.
Mistake #1: Dumping the whole cup of confectioners’ sugar into the mixer and turning it on high. Rocco was covered in it. Whoops.
Mistake #2: My curly Christmas tree tops. This happened because I didn’t fold my parchment paper over enough so that it fit the tray properly. The paper curled up on the sides and the trees were on the paper right at that spot, so that’s the way they cooked. Make sure you truly cut (or fold) your parchment paper down to size.
Mistake #3: Relying on the timer and not watching my cookies. My final tray was way overdone because I didn’t properly account for how much less time a single tray would take to cook than two trays. I got distracted by other things (I dunno, maybe the screaming children? Just a guess.) and didn’t think about them again until my timer went off. I ended up trashing almost this whole tray - they were that overcooked.
I hope you enjoy these shortbread cookies as much as Stella does - especially with the chocolate. She likes the chocolate the best :)